* 잘못된점이 있으면 피드백 주시면 감사하겠습니다!

react-query를 보면 data, loading, error 상태가 있고 로딩 화면, 에러 화면을 각각 보여줄 수 있다
리둑스와 리둑스 사가로 비슷한걸 연습겸 한번 만들어 보았다.
*혹시 redux-saga 가 익숙하지 않다면
https://mskims.github.io/redux-saga-in-korean/introduction/BeginnerTutorial.html
추천
우선 초기 constant 를 정의한다.
/* constrant.ts */

export const START_LOADING = 'loading/START_LOADING';
export const FAIL_LOADING = 'loading/FAIL_LOADING';
export const FINISH_LOADING = 'loading/FINISH_LOADING';

export const GET_ITEM = 'GET_ITEM';
export const GET_ITEMS = 'GET_ITEMS';

export const RESPONSE_STATUS = {
  REQUEST: {
    data: undefined,
    error: false,
    empty: false,
    loading: true,
  },
  FAILURE: {
    data: undefined,
    error: true,
    empty: false,
    loading: false,
  },
  SUCCESS: {
    error: false,
    loading: false,
  },
} as const;
RESPONSE_STATE는 각 비동기 조건(data, loading, error)때 가지고 있을 상태이다.
SUCCESS의 경우엔 fetch된 data를 가지고 있어야 하기 때문에 나중에 상태를 만들때 주입할 예정이다.
~LOADING constrant들은 각 조건때의 action이다.
GET_ITEM, GET_ITEMS는 각각 아이템 하나, 아이템 리스트를 받아오는 비동기 요청 action이다.
이제 action를 제작해보자.
// action.ts

export const LOADING_STATUS = {
  GET_ITEM,
  GET_ITEMS,
} as const;

export type LoadingStatusType = typeof LOADING_STATUS[keyof typeof LOADING_STATUS];

function getVaildRequestType(requestType: string): LoadingStatusType {
  return LOADING_STATUS[requestType];
}

export const startLoading = (requestType: string) => ({
  type: START_LOADING,
  payload: getVaildRequestType(requestType),
});

export const failLoading = (requestType: string) => ({
  type: FAIL_LOADING,
  payload: getVaildRequestType(requestType),
});

export const finishLoading = (requestType: string, response: []) => {
  return {
    type: FINISH_LOADING,
    payload: getVaildRequestType(requestType),
    response,
  };
};
getVaildRequestType을 쓴 이유는 action과 reducer를 추상화하고 비동기 요청때마다 기본 템플릿으로 재사용하기 위해서 저런 번거로운 방식을 사용한것이다. (requestType로 type를 보내준다.)
(사실 getVaildRequestType을 안쓰고 그냥 payload:requestType해도 되긴 하는데 확장성을 위해서(혹시 상태의 이름을 변경하고 싶을때 사용하라고) 넣었다)
reducer를 만약 재사용을 하지 않는다면 비동기 요청 하나하나마다 각각 reducer를 제작해야하는 번거로움이 존재한다.
이것은 reducer를 보면서 자세히 설명한다.
LOADING_STATE의 역할도 reducer를 보면서 설명한다.
각 action에 넣어주는 requestType는 redux-saga에서 넣어준다
// reducer.ts

function setInitState() {
  const init = {};

  const { REQUEST } = RESPONSE_STATUS;
  // eslint-disable-next-line no-return-assign
  Object.keys(LOADING_STATUS).map((key) => (init[LOADING_STATUS[key]] = REQUEST));
  return init;
}

interface LoadingActionType {
  type: string;
  payload: string;
  response?: [];
}

export function asyncLoadingReducer(state = setInitState(), action: LoadingActionType) {
  const { type, payload, response } = action;
  const { REQUEST, FAILURE, SUCCESS } = RESPONSE_STATUS;

  switch (type) {
    case START_LOADING:
      return {
        ...state,
        [payload]: REQUEST,
      };

    case FAIL_LOADING:
      return {
        ...state,
        [payload]: FAILURE,
      };
    case FINISH_LOADING:
      return {
        ...state,
        [payload]: { ...SUCCESS, data: response, empty: isEmpty(response) },
        //isEmpty는 그냥 fetch된 데이터가 비었나 확인해주는 함수
      };
    default:
      return state;
  }
}
[payload] : ~~상태 를 사용해서 아까 보낸 getVaildRequestType의 파라미터마다 상태를 가질 수 있다.
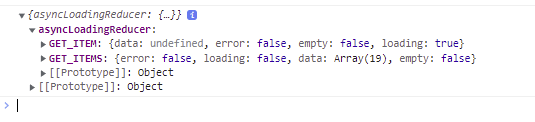
예를 들어 LOADING_STATE에 지금 GET_ITEM 과 GET_ITEMS라는 type를 지정해두고 이후 redux-saga에서 실행할때 해당 type를 requestType(payload)로 받아온다면 type마다 { data, loading, error } 결과값을 가지는 상태를 가질 수 있다!
(이게 무슨말인지 혼동된다면 아래의 redux-saga까지 보고오면 이해가 빠를것 같다)
GET_ITEM, GET_ITEMS 각각 type 하나마다 { START_LOADING, FAIL_LOADING, FINISH_LOADING } case 상태(RESPONSE_STATE)를 가진다.
SUCCESS(case FINISH_LOADING)땐 아까 만든 상태에 data를 주입해서 반환해주자.
이제 redux-saga를 보자.
function* abstractGenerator({ ACTION, axiosRequest }) {
  yield put(startLoading(ACTION));

  try {
    const response = yield axiosRequest;
    yield put(finishLoading(ACTION, response.data));
  } catch (error) {
    yield put(failLoading(ACTION));
  }
}

function *getItemListGenerator() {
  yield abstractGenerator({ ACTION: GET_ITEMS, axiosRequest: call(getItemList) });
}

function *getItemByIdGenerator(status: { id: number; type: string }) {
  const { id } = status;
  //yield put ~~
  yield abstractGenerator({ ACTION: GET_ITEM, axiosRequest: call(getItemById, id) });
}

function* getItemLIstSaga() {
  yield takeLatest(GET_ITEMS, getItemListGenerator);
}

function* getItemByIdSaga() {
  yield takeLatest(GET_ITEM, getItemByIdGenerator);
}

export function* rootSaga() {
  yield all([getItemLIstSaga(), getItemByIdSaga()]);
}
비동기의 기본 로직을 잘 보면
function* abStractGenerator({ ACTION, axiosRequest }) {
  yield put(startLoading(ACTION));

  try {
    const response = yield axiosRequest;
    yield put(finishLoading(ACTION, response.data));
  } catch (error) {
    yield put(failLoading(ACTION));
  }
}
1. 데이터 fetch를 시작한다 - START_LOADING(action)
2. action(GET_ITEM, GET_ITEMS)에 따라 ajax 요청을 보내고, - START_LOADING
3. 데이터를 받아오는데 성공했다면 성공 action을 반환한다. - FINISH_LOADING
4. 실패했다면 실패 action을 반환한다. - FAIL_LOADING
비동기 요청시 대다수의 redux-saga는 비슷한 로직으로 실행될것이다.
그럼 이 비동기 로직도 달라지는 값인 action과 ajax 함수 값만 파라미터로 주입해준다면 재사용을 할 수 있다.
그리고 여기서 action인 startLoading, finishLoading, failLoading에 넣는 ACTION이 아까 보았던 requestType의 정체다.
그렇게 넣으면 payload로 action이 들어가게 되고... asyncLoadingReducer에서 [payload]마다 로딩, 에러, 성공시 알맞은 상태를 반환한다.
이런식으로 1개의 reducer, 1개의 saga를 재사용해 n개 이상의 다른 비동기 요청을 처리할 수 있다.
그리고 ajax 함수들은 이런식이다.
export const getItemList = () => axios.get(API.GET.ITEMLIST); // API.GET ~ 는 주소

export const getItemById = (itemId: number) => {
  return axios.get(API.GET.ITEM, {
    params: {
      itemId,
    },
  });
};
예시 component)
export function ItemBox() {
  const { asyncLoadingReducer } = useSelector((state: RootStoreType) => state);
  const disPatch = useDispatch();

  const itemRequest = asyncLoadingReducer[LOADING_STATUS[GET_ITEM]];
  const { data, empty, loading, error } = itemRequest;

  useEffect(() => {
    disPatch({ type: GET_ITEM, id: 1 });
  }, []);

  if (loading) return <div>loading</div>;
  if (empty) return <div>emptyData</div>;
  if (error) return <div>error</div>;

  return <div>{JSON.stringify(data)}</div>;
}
추가)
import { createStore, combineReducers, applyMiddleware } from 'redux';
import createSagaMiddleware from 'redux-saga';
import { asyncLoadingReducer } from './reducer';
import { rootSaga } from './saga';

const configureStore = () => {
  const sagaMiddleware = createSagaMiddleware();
  const rootReducer = combineReducers({
    asyncLoadingReducer,
  });

  const store = createStore(rootReducer, applyMiddleware(sagaMiddleware));
  sagaMiddleware.run(rootSaga);
  return store;
};

const rootStore = configureStore();

export type RootStoreType = ReturnType<typeof rootStore.getState>;
export default rootStore;
해본 후기)
그냥 react-query 쓰자
같이 읽으면 좋은 글)
https://techblog.woowahan.com/6339/
Store에서 비동기 통신 분리하기 (feat. React Query) | 우아한형제들 기술블로그
오늘은 주문에서 사용하는 FE 프로덕트의 구조 개편을 준비하며 FE에서 사용하는 Store에 대해 개인적인 고민 및 팀원들과 검토하고 논의했던 내용을 소개합니다. 이 과정에서 생긴 여러 가지 의
techblog.woowahan.com
'Front-end > React' 카테고리의 다른 글
| react 17(개인 공부용) (1) | 2022.06.09 |
|---|---|
| React18(개인 공부 메모용) (0) | 2022.06.09 |
| react TMI (0) | 2022.04.13 |
| drag and drop으로 창 크기 조절 (0) | 2022.03.18 |
| redux 기본 구조 (0) | 2022.02.02 |